Home » Home Services
Category Archives: Home Services
Septic Tank Methods
The septic tank is a simple onsite sewage system that provides basic wastewater treatment. Waste reaches the tank, where it is absorbed by bacteria and then enters the drain field. Click https://www.septictankarmadale.com.au/ to learn more.
When waste decomposes in the septic tank, it creates methane gas. This is flammable and explosive. Ventilation is essential around the septic tank.

The septic tank is the heart of your septic system. It’s a large, underground concrete or plastic tank that holds waste and wastewater from your house. Its one end is connected to an inlet wastewater pipe, and its other end connects to a septic drain field.
When you flush your toilets or use your sinks, bathtub, shower, washing machine, and dishwasher, wastewater (called gray water) runs into the septic tank from your house’s plumbing. Solid materials, such as feces and cooking fats, sink to the bottom of the tank, where microorganisms decompose them. Liquids, such as water and washing detergents, float to the top of the tank, where bacteria create a layer called scum.
Bacteria in the septic tank break down organic wastewater pollutants, creating a liquid stream known as effluent. The effluent then exits the septic tank through perforated pipes into the drain field, where it flows through gravel and soil that act as natural filters and purify the water before it seeps back into the groundwater.
In some cases, septic tanks can overflow or clog. If you suspect this is happening, call a plumber. You may need to have the tank pumped. The tank is usually inspected at least once every three to five years.
A septic tank that needs to be properly maintained can pollute soil and surface water. It can also cause wastewater to enter household plumbing, leading to sewage backups in sinks and toilets.
You can help your septic system work better by not disposing of items that are too large or heavy to decompose in the tank. Some of these include coffee grounds, cigarette butts, cat litter, facial tissues, paper towels, dental floss, and plastics. You should also avoid using strong chemicals and bacteria-destroying products, such as drain cleaners, solvents, paint thinners, floor cleaners, motor oil, antifreeze, and pesticides. These can disrupt septic tank and absorption system operation and can be harmful to humans, pets, and the environment.
The drain field
After solids have settled and decomposed inside the septic tank, liquid wastewater (known as effluent) leaves via an outlet pipe toward your drain field. The drain field is also called the absorption field, and it contains a network of pipes in trenches filled with gravel. The pipes are perforated to allow wastewater to flow through them. This allows soil to naturally treat and filter the water.
The drain field is designed to allow effluent to slowly seep into and through the soil, where it is further treated by bacteria. This process is important for the overall health and functionality of your septic system. A septic system that isn’t treating wastewater properly can lead to sewage backups, unpleasant odors, and even groundwater contamination.
To help keep your septic system functioning properly, never flush non-flushable wipes, cat litter, cooking oil, pharmaceuticals or other toxins down the drain. These substances can kill the organisms in your septic system that digest and treat household waste. They can also clog and damage your septic tank and drain field.
Regularly checking and cleaning your septic tank baffles and other parts of the septic system is also necessary. These parts can become worn out or damaged over time due to normal use, as well as by tree roots and other debris. Keeping these parts of your septic system clean can prevent them from failing or becoming clogged, which can reduce the efficiency of your septic system and increase the frequency of pumping.
You should also have your septic tank pumped at least once every three years. If you don’t have it pumped regularly, the solid waste in your septic tank will not have sufficient time to settle before being sent to the drain field. This can clog the drain field and cause wastewater to overflow, exposing you and your family to disease-causing bacteria.
The drain field is the last step in your septic system’s filtration process. It is very important that you do not plant any plants that have deep roots over the drain field, as they will interfere with its filtration. Instead, plant grass and other shallow-rooted plants over the area of the drain field.
The pipes
In addition to a lid, septic tanks should have an inlet baffle and outflow pipe. The inlet baffle slows wastewater, helping it to settle and not stir up the sludge inside the tank. It also prevents odors from being carried by the sewer line into the home or building. The outflow pipe, which is commonly referred to as the drain field, moves pre-processed sewage from the septic tank into the soil below. The wastewater enters the drain field through watertight 4-inch diameter pipes, or a series of 6-inch-diameter perforated plastic pipes, that are placed in a trench filled with stone. The piping network is often laid in a grid pattern across the drainfield to ensure even distribution of the sewage.
Depending on the septic tank volume, daily household usage and local environmental conditions, the raw sewage in the tank will decompose for between 48 and 72 hours. The indigestible solid waste forms a layer of sludge and the dissolved substances form a liquid called effluent. The effluent is pushed into the drainfield by a pump or, in some cases, by gravity.
The septic system in a home or commercial building usually consists of an underground drainfield that is surrounded by gravel and covered with a geofabric or similar material to keep sand and dirt out of the clean stone. The effluent drains through the gravel and into the soil, where microbes treat it further.
To reduce the risk of clogging, a septic tank’s inlet and outlet pipes should be made from acid-resistant concrete or cast iron. The inlet and tank drainfield pipes should be protected by a series of baffles or sanitary tees and have 6-inch-diameter inspection pipes for checking for sludge levels and clogs. The absorption field should be a minimum of 15 feet away from the home or structure.
Never flush cooking grease, chemical drain openers, non-flushable wipes (including baby and makeup removal), coffee grounds, bones, cigarette butts or other organic chemicals down the toilet or drain. These can upset bacterial digestion and pollute groundwater. Likewise, don’t use additives that claim to enhance bacterial action. They don’t work and could cause clogs.
The pump
When it’s time to have your septic tank pumped, the waste is removed by a truck with a large suction hose. This hose literally sucks the sewage into the truck, where it’s then taken to a sewage processing site to be safely disposed of.
The septic system disposes, filters, and treats household waste for homeowners not connected to municipal sewer systems. Wastewater leaves your house through a series of pipes that first transport it to the septic tank. Once there, it undergoes a settling process. Solid waste and sediment sink to the bottom of the tank while oil and grease floats to the top of the liquid layer. Over time, bacteria digest the sludge that settles in the tank.
Once the liquid level rises to the top of the septic tank, it exits the tank through a pipe into the drain field. The septic system’s main function is to remove solids from household wastewater, so the wastewater can more easily filter through the soil absorption field. Without the removal of solids, the septic system could become overloaded and fail.
Keeping your septic tank and the surrounding soil in good condition is essential for maintaining proper septic system function and protecting the environment. Routine pumping of your septic tank helps prevent overflow, clogging of toilets and other household drains, and ensures that the wastewater is properly treated in the soil absorption field.
In addition, routinely flushing non-biodegradable items like coffee grounds and paper towels can cause a buildup of solids that will clog the drain field and septic tank. Only biodegradable toilet paper and human waste should be poured down the drains.
Signs of a clogged septic system include foul odors, slow draining or backed-up toilets, and gurgling sounds from sinks and toilets. If you’ve noticed any of these signs, contacting your local septic system professional for routine pumping is the best course of action.
Insulation Removal – How to Prepare Your Attic Space For Removal
Insulation Removal Perth is a demanding DIY project that requires adherence to strict safety guidelines. Before beginning, clear your attic space of any items to reduce the risk of contamination or damage.
Poor insulation can compromise your home’s energy efficiency and impose structural risk. Identifying and addressing problems promptly can prevent more costly repairs in the future.
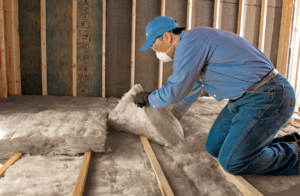
Insulation removal can be messy and time-consuming, but it’s essential for home energy efficiency. Outdated insulation can cause drafty homes, and mold and rodent infestations can degrade and contaminate existing insulation materials. Removing old insulation also improves indoor air quality by eliminating toxins, allergens, and pests.
Insulation can be made of various materials, and each type of insulation requires different removal methods and safety precautions. If mold, animal feces, or asbestos are present in the attic, professional removal may be necessary to ensure the health and safety of everyone involved in the removal process.
The first step in removing attic insulation is to clear the attic space, creating a safe workspace for the removal process. Clear a path to the attic access door and cover any surface coverings with a sheet or other protective material to prevent damage. The next step is to clear out any equipment or belongings stored in the attic space. This can be a difficult task for homeowners, but a professional attic cleanup service can make the process much easier and safer.
Once the attic is cleared, the next step in attic insulation removal is to locate and disconnect any live wires in the attic space. This step is important because it eliminates the risk of electrical shock and fire hazards, and it also reduces the amount of dust and debris that could come into contact with live wires during the removal process.
Blown in attic insulation is typically removed by machine using a vacuum process to suck the old insulation into bags that are then hauled away and properly discarded. Fiberglass batt insulation, on the other hand, is more difficult to remove, and it’s recommended that homeowners hire a professional to remove fiberglass insulation from the attic.
Once the attic is clean and all insulation has been removed, it’s a good idea to inspect the attic to make sure that no rodents or insects have nestled in the attic or contaminated the newer insulation materials with droppings and urine. The attic should be cleaned and sanitized before insulation replacement is installed.
Walls
Insulation in walls can be difficult to reach without tearing down the wall itself. However, it is often worth the effort to get the job done properly to avoid mold and mildew in your home. Old insulation can also be a breeding ground for vermin. Proper removal prevents these problems and helps to keep your family safe and healthy.
Cavity wall insulation removal, or extraction, is a process that involves the use of a vacuum machine to extract the old insulation from the cavity in your home’s exterior walls. This is usually necessary when the insulation has caused damage or it is no longer effective. This process also allows for new insulation to be installed correctly, making it more energy efficient.
Whether you have fiberglass batt or roll insulation in your walls, it can be easily removed by yourself if you follow some simple steps. First, you will need to put on a pair of protective goggles to protect your eyes from loose fibers and dust. A face mask or respirator will also help to avoid inhaling any of these particles that may be floating around in your home.
Once you’ve donned your safety gear, you can begin to remove the old insulation. You’ll need a tool to cut the staples holding the strips of insulation in place. Then, you can slowly rake the insulation away from the wall and into a garbage bag. It’s a good idea to work in sections, working from the bottom up and saving the top of the strip for last. This will help prevent the strips from falling down and disturbing the surrounding area.
If you’re not comfortable with handling the removal of your own insulation, it’s best to call a professional. An expert will be able to perform an energy audit of your house and determine if the current insulation is in good condition or if it needs to be replaced. They will be able to tell you if the insulation in your attic, crawl space, or walls is damaged and in need of repair or replacement.
Ceilings
Insulation in the ceiling can become dirty, dusty and contaminated over time, and this is why many homeowners opt to remove it and install new insulation. It is essential to prepare the space before starting the process, and this includes removing any furniture or personal belongings that are stored in the attic. It is also a good idea to cover the floor and walls with plastic sheeting to ensure that nothing gets soiled or damaged. Professionals have the proper equipment to handle this process safely and efficiently, and they are able to dispose of the insulation properly.
Depending on your home’s age, the attic’s insulation could have lost its R-value and may no longer provide optimal energy efficiency. Old insulation can also be damaged or contaminated with mold, mildew and pests. In addition, if water gets into the insulation it can create problems like mold, pipe corrosion and sheetrock damage. It is important to inspect the attic and other areas of your home regularly to catch these issues before they worsen.
If your attic is full of rodent droppings and urine stains it is likely time to have the insulation removed. This type of contamination can lead to respiratory and health issues. It is also best to remove the insulation if it has been damaged by water to prevent further issues.
When it comes to removing blown-in insulation, it is a much more complicated process that requires specialized equipment. It is often a long and messy job that involves crawling around the attic on your hands and knees to vacuum out the material. It is essential to have the right safety gear, including a pair of protective gloves and a face mask that is rated at least 95-rated for toxic particles.
If you are looking to add or replace insulation in your home, it is recommended that you hire a professional to do the job. They will be able to assess the condition of your current insulation and recommend the best course of action to take. It is also a good idea to remove the existing insulation before beginning any projects like rewiring, installing fans or lighting or adjusting ceiling heights. This will prevent damage to the new insulation as you work.
Floors
If a home has outdated or ineffective floor insulation, it’s important to replace it. This will improve energy efficiency and comfort, and it may also reduce moisture problems, including mold growth.
The best insulation for floors is a cellulose or fiberglass product, which is often installed in between joists. This helps to reduce sound transfer between floors, and it can be particularly helpful in older homes and apartment buildings that have a lot of noise. Insulation in the floors is also important because it helps to regulate temperature and reduce heat loss, which can lower heating bills.
When removing old insulation, it’s important to follow proper safety measures. This includes wearing protective gear, such as respirator masks, safety goggles, and gloves. It’s also a good idea to cover the walls and floors of your attic access area with plastic sheeting so that you don’t inhale dust particles, irritants, and potentially harmful substances while working.
Once you have all of the necessary equipment, it’s time to get started. First, make sure that you’re well-supplied with industrial-sized waste bags, a vacuum cleaner with a HEPA filter, and dustpans and rakes to clean up the mess. Before you start the process, be sure to turn off your heating system and close any vents that lead into the attic space. It’s also a good idea for you to wear a hard hat, as falling through the roof of your attic can be extremely dangerous.
Before you begin the removal process, make sure that your attic is well-ventilated. It’s also a good idea not to leave any garbage or boxes in your attic. This can attract rodents, which can damage or destroy your insulation. You should also look for signs of rodent or mold infestations in your attic space. Rodent droppings and mold can contaminate your insulation and cause health issues for you and your family, so it’s important to take care of these problems immediately.
The next step is to remove any contaminated insulation from the attic floor. This should be done quickly, as contaminated insulation hinders airflow into the attic space. When it’s removed, you can then insulate the attic floor with products such as rock mineral wool slabs or rolls, which provide thermal and acoustic insulation.